I've been anticipating this post for a long time, since ordering a new HDD (hard disk drive) for my System76 Gazp6 [1] in April.
After upgrading the RAM and battery as mentioned in my last post [2], the next goal was to upgrade the HDD as well. However, I first wanted to have a clean OS and applications installed on it's existing hard drive, so that I would have a functioning backup to switch back to in case of an emergency. It's always good to plan for redundancy and unexpected situations, such as a visit from Mr. Murphy of Murphy's Law [3] fame (possessing the incredible ability to pay a visit at the worst possible time and circumstance).
With this in mind, I had opted to order an HGST Travelstar 1TB HDD [4], after reading reviews of various manufacturers regarding reliability and operating performance, as well as talking to friends that had used and recommended it. Although the idea of buying an SSD (Solid State Drive) was an option that was considered, in the end I prioritized reliability and capacity as higher-valued purchasing parameters than speed. The HGST had good reviews and ratings [5] and gave me the capacity, performance and reliability that I wanted for a reasonable price point. With shipping and taxes, I paid $100.79 CAD
With Ubuntu's 18.04 Bionic Beaver having been released in late April, I went about doing a clean install on the Gazp6's existing 250 GB HDD, as well as the custom installs of applications, system tools and settings that I made use of. I also used the time to test a script that I had written in BASH to automate application installation, setup and configuration, since I intended to carry out the same procedures on both my gazp6 and panp8. I tested the script on a virtual machine image of Bionic running in VirtualBox. A screenshot of part of my script code and the test run is shown below.
 |
| BASH script to automate application and system tool installation and configuration, and test on running 18.04 VM image |
With testing done to satisfaction, the next step was to clean any personal data off the drive, and then move on to installing the new HGST TS-7K1000-1000 HDD. It was time to play "operation".
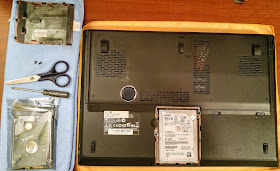
Having put the patient down and in a deep state of rest, I took the cover off the HDD compartment and carefully slid out the existing HDD. When I flipped it over, I was surprised to see that I was holding a Seagate Momentus 250 GB 5400.6 with an Apple logo; based on the HDD and temperature being provided from the GNOME freon extension utility that I had installed, I had always inferred that the gazp6 had a Western Digital HDD. In any case, surgery proceeded and the new HGST was extracted from the anti-static wrapping, put into place and the cover screwed back on. Now the patient needed to be woken up and see if the "smarts" could be put in place.
The next step was to test that the BIOS had properly detected and registered the HDD. Upon power on and looking at the system setup menu, I was relieved to see the HDD name, model number and capacity show up on the main page. With that verified, I moved to the Boot Order menu, moved the USB boot option to the primary position. That ensured that upon system boot, it would look for the USB flash drive containing the Ubuntu 18.04 installation image that I had written onto it. With all that done, I saved the configuration, exited the BIOS and rebooted the system.
The rest of the process went off without a hitch. The gazp6 picked up the USB drive with the Ubuntu installation image, loaded it, and the installation went as normal. The whole process from taking the HDD cover off to finishing Ubuntu installation and rebooting took less than 30 minutes.
I also ran the gazp6 for 48 hours of battery charge and discharge, observing the time available on standby, and from full capacity to empty. The gazp6 went on suspend mode from 100% charge for 24+ hours and still had 70%+ capacity when woken up. On standby, it averaged around 2.5 hours on a single charge as shown by the plots from Ubuntu's Power Monitoring app over a 2 hr and 6 hr timeframe respectively. I'm happy with that.
Following
are some photos of the process. I'll be observing and testing the gazp6
over the course of this week, running the automated install script and
finishing setup. If everything seems to be functioning well, I'll be replicating the surgery on my panp8 this weekend.
REFERENCES:
==========
[1] A Rescued Orphan - System76 Gazelle Professional Gazp6
[2] System76 Gazelle Professional Gazp6: RAM & Battery Upgrade
[3] Murphy's Law
[4] HGST Travelstar TS-7k1000-1000


No comments:
Post a Comment